Hotline Data Dump
v1.1 - 07.10.2020
This document was created by Urinstein with help from dump
All the necessary data mining was done by dump with some help from Urinstein
The AI state table is heavily condensed into just a few heavily loaded terms in the interest of readability. It is important that you understand the meaning of those terms in order to understand the table.
So please have a look at the Glossary at the bottom and read it with care.
AI States
| Gun Roamer | Gun Patrol | Gun Stationary | Melee Patrol / Fatso | Melee Stationary | Dog | Idle |
Neutral State 0 | speed: 0 or 1 u/ fr
random load direction RandomMove 60-120
load offset: 60-120 | speed: 1 u/fr
point right
turn left on collision | speed: 0 or 2 u/fr
random load direction create path home | speed: 1 u/fr
point right
turn left on collision | speed: 0 or 2 u/fr
random load direction create path home | speed: 1 u/fr
point right
turn right on no collision |
see Tab. 2 (Idle State 0) |
If hear sound:
walk along path switch to State 2
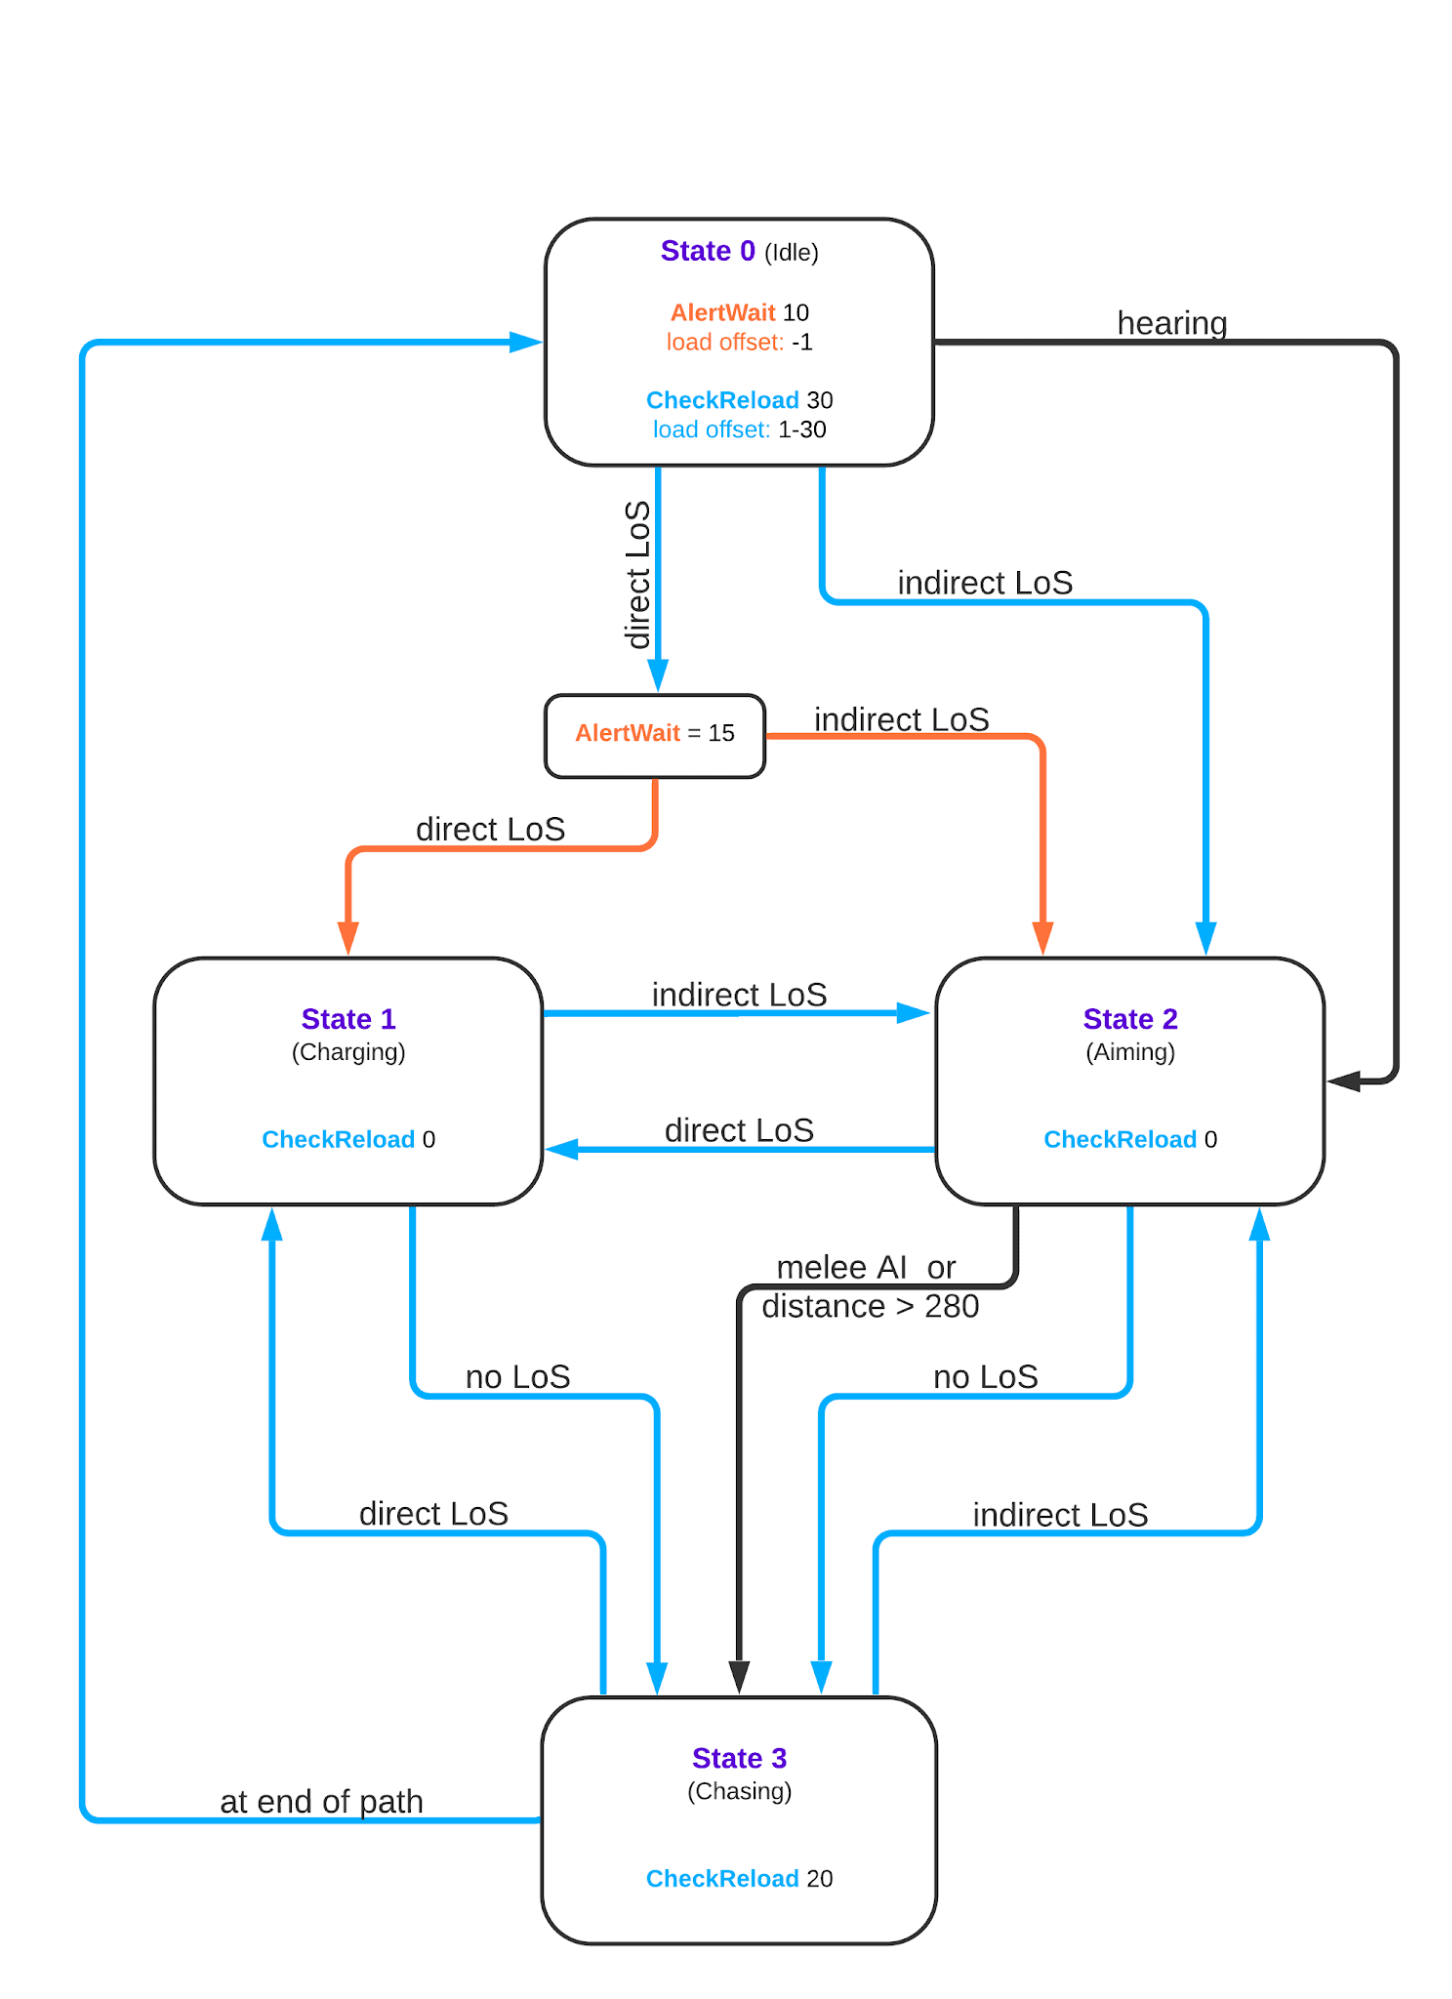
AlertWait 10 load offset: -1
CheckReload 30 load offset: 0-30
If direct LoS: AlertWait = 15
If indirect LoS:
switch to State 2
If direct LoS: switch to State 1
If indirect or no LoS: AlertWait = -1 switch to State 2 | If hear sound: switch to State 2
AlertWait 0 load offset: -1
CheckReload 30 load offset: 0-30
If direct LoS: AlertWait = 0
If indirect LoS:
switch to State 2
If direct LoS: switch to State 1
If indirect or no LoS: AlertWait = -1 switch to State 2 |
Charging State 1
(attacking w/ direct LoS) | speed: 3 u/fr turn speed: 10°/fr
shoot + run directly at player If distance < 80 units: Turn to player 10°/fr
decelerate by 0.25 u/fr Else face player Accelerate by .25 u/fr (max 3) | speed: 3 u/fr turn speed: 10°/fr
run directly at player If distance < 8 units:
kill player | speed: 5 u/fr turn speed: n/a
Accelerate towards player
by 0.5 u/fr (max 5) If touching player
and speed > 1:
kill player |
|
CheckReload 0
If indirect LoS:
switch to State 2
If no LoS:
switch to State 3 |
|
Aiming State 2
(attacking w/ indirect LoS) | If distance > 280 units:
switch to State 3 Else shoot
If no path: stand still
If distance < 80 units:
Turn to player 10°/fr Else face player
CheckReload 0
If direct LoS: switch to State 1
If no LoS:
switch to State 3
| switch to State 3
|
|
Chasing State 3
(following path) | speed: 2 u/fr
If not on a path generate path to player
CheckReload 20
If direct LoS: switch to State 1 (unless Dog/Detective)
If indirect LoS: update path (unless Dog/Detective/Policeman)
If at end of path: play animation stand still for 50 fr (unless Melee Patrol)
switch to State 0 |
|
Knocked Down | hitbox: 16x16 After 115-235 frames: switch to Unarmed |
|
|
Unarmed | RandomMove 60-120 If LoS to weapon: grab weapon and switch to Melee Patrol/Gun Roamer State 0
load offset: 60-120 |
|
|
Tab. 1: AI States
Idle State 0
| Peeing | Smoking | Sitting | Phone | Guard |
State 0 | CheckReload 20
load offset 1-10
If LoS: randomly create Melee Stationary or Gun Roamer (AR)
face player
If direct LoS: switch to State 1
If indirect LoS: switch to State 2 | CheckReload 15
load offset 1-10
If LoS: randomly create Melee Stationary or Gun Roamer (AR)
face player
If direct LoS: switch to State 1
If indirect LoS: switch to State 2 | CheckReload 30
load offset 1-10
If LoS: get up animation randomly create Melee Stationary or Gun Roamer (AR)
face player
If direct LoS: switch to State 1
If indirect LoS: switch to State 2 | CheckReload 15
load offset 1-10
If LoS: create Gun Roamer (AR)
face player
If direct LoS: switch to State 1
If indirect LoS: switch to State 2 | CheckReload 15
load offset 1-10
If LoS: create Gun Roamer (AR)
face player
If direct LoS: switch to State 1
If indirect LoS: switch to State 2 |
|
On death | drop gun / melee | drop gun | drop gun / melee | drop gun | drop M16 |
On Knockdown | drop gun / melee |
Tab. 2: Idle State 0 *no guns/gunmen on Metro - no melee on Clean Hit* *the sitting AI on Vengeance 1 can only spawn with a golf club on LoS*
Speeds
1 u/fr | 2 u/fr | 3 u/fr | 3.5 u/fr | 4 u/fr | 5 u/fr |
State 0
Unarmed | Patrols / Roamers / Dogs Roaming | State 0 State 3 Hostage
Stairs Unarmed | Stationaries
all AI on controller only player getting weapon | Richard
Biker State 1 |
without Cleaver all but Dogs | Graham
Biker
Jacket |
maskless | Brandon Hostage Bug |
| State 1 | Dogs |
12 u/fr | 10-16 u/fr | 12-16 u/fr | 16 u/fr |
|
|
|
|
Throwing | incl Biker | Double Barrel |
| Pumpgun |
| every other gun's bullets |
|
|
|
|
Tab. 3: Speeds
pump 12-16
db 10-16
default 16
throwing (incl biker's knife) 12
Weapon Spreads
0° | 4* | 6° | 10° | 12° | 20° |
Magnum
Biker's throwing knives | Throwing weapons | M16 Scorpion Pistol | Uzi (silenced) MP5
thrown melee or guns | Pumpgun | Double Barrel |
Tab. 4: Weapon Spreads
Weapon Drops
method | Dropping | Standing Execution | Melee Kill | Gun Kill | Knockdown |
0° direction | player direction | AI direction | straight up (cardinal direction) | direction of bullet impact | AI direction |
drop direction | dir+70+random(40) | direction-115+random(50) | -70+random(40) | bullet.direction-70+random(40) | direction-70+random(40) |
speed | 1-3 u/fr | 2-3 u/fr | 2-4 u/fr | 2-4 u/fr | 2-4 u/fr |
visual | 
| 
| 
| 
| 
|
Tab. 5: Weapon Drops
Hurtboxes / Collision Masks
size | 16x16 | 16x8 | 6x6 |
objects | Jacket / Biker Gun Roamers Gun Stationaries Knocked Down Unarmed | Gun Patrols Melee Patrols Melee Stationaries | Dropped Weapons Thrown Weapons |
visual | 
| 
|


|
Tab. 6: Hurtboxes / Collision Masks *If a Gun Patrol goes into State 3 their hurtbox changes to 16x16 and remains so until they despawn*
*If you try to hit an AI through a wall with a melee weapon, their hurtbox changes to 6x6 until they despawn or go into Gun State 3*
*If you do the same with fists, it changes to 16x16*
*Leaning AI's hurtbox is fucked. It's 16x16 fo execution but for melee it's inside the wall and for bullets it's just really small inside their head*
*Also you can kill Leaning AI through walls if you hug the wall*
Frame Data active +inactive frames
Melee Weapons | Ranged Weapons | Executions |
14 +6 | Fists | +4 | M16 |
|
|
12 +13 | Bat | +30 | Pumpgun |
|
|
12 +10 | Pipe | +10 | DB |
|
|
12 +7 | Golf Club | +8 | Magnum |
|
|
8 +2 | Knife | +2 | Skorpion |
|
|
18 +2 | Suitcase | +2 | (Silenced) Uzi |
|
|
14 +11 | Pot | +3 | MP5 |
|
|
12 +8 | Pool Cue | +6 | Silenced Pistol |
|
|
10 +10 | Broken Pool Cue | +20 | Throwing weapons |
|
|
16 +4 | Crowbar | +30 | Biker's Knife |
|
|
16 +4 | Pan |
|
|
|
|
20 +10 | Axe |
|
|
|
|
12 +2 | Baton |
|
|
|
|
16 +4 | Trophy |
|
|
|
|
18 +2 | Drill |
|
|
|
|
7 +8 | Katana |
|
|
|
|
16 | Machete |
|
|
|
|
37 | Sledge Hammer |
|
|
|
|
16 | Biker's Cleaver |
|
|
|
|
Tab. 7: Frame Data *Execution Frames are not data mined yet, hopefully in the future*
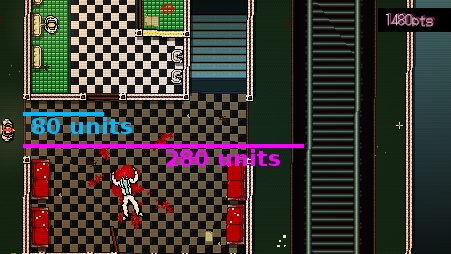 Fig. 1 Distances Fig. 1 Distances | 
Fig. 2 Player Hitbox and Melee Hurtbox |
Health
Fatso Health:
If a fatso is moving, not on a path and you land a 7th hit, they die and skip the dying animation.
Every frame their health decreases by 1 + hits/4 per frame. Their health is 120.
Magnum bullets count as one bullet and penetrate.
Other Health:
AI spawn with either 0 or 1 health. A bullet/pallet does 1 damage. AI dies when health < 0.
Magnum bullet and lethal throwing weapons kill consistently.
Player Health:
The player spawns with either 1 or 2 health. A bullet/pallet does 1 damage. They die if their health reaches 0.
Glossary
LoS / Line of Sight | There are two types of LoS:
Direct LoS is established if there are no objects between you and the AI and your distance is below 280 units.
Indirect LoS is established when there are only transparent objects (i.e. glass, tables, etc.) between you and the AI. This can happen over any distance.
State 0 Dogs cannot see through unbroken glass. |
CheckReload | This variable decrements by 1 every frame until it reaches 0, at which point it gets reset to whatever value is specified for the respective state the AI is in.
Lastly all the colour matched checks will be done.
Together with RandomMove this is the single biggest (intended) source of randomness in the game. |
AlertWait | Like CheckReload this variable decrements by 1 per frame. However it only does so while in State 0. When it reaches 0 it gets reset to the specified value (-1) and all the colour matched checks are done. This timer is essentially a reaction delay and has the effect of making the AI seemingly see you through walls, since it does not check for LoS. |
RandomMove | This variable also decrements by 1 every frame. When it reaches 0 it gets reset to a value from the specified range. The AI is then rolled a new direction and a new speed (0 or 1 u/fr). |
load offset | When a new floor is loaded, every AI is individually rolled a starting value for their respective timers. The load offset is the range from which a starting value can be chosen.
Offsets and movement are saved when you load into a screen, so when respawning on the same screen the AI's initial attributes (reaction and roamer movement) will always be the same. |
random / roll | The terms random and roll will always refer to a uniform distribution within the specified ranges. |
units / u/fr | A unit corresponds to 1 pixel at a vertical resolution of 256px. That means in 1080 resolution it corresponds to around 4.22 pixels.
Accordingly u/fr (units per frame) describes the speed of an AI or the player. Naturally the game is locked at 60 fps. |
Path | In State 3 (rarely 2) the AIs walk along paths. These paths are generated along the nav mesh which means that they are very angular and include weird movements like hugging the sides of doorways and such. A good rule of thumb is that both you and the AI should stand away from furniture, as well as the bottom and right side of walls, all of which casts large dead areas in the nav mesh.
Due to the crude nav mesh and likely some engine level issues path generation is prone to fail, in which case the AI will go back to State 0.
An AI will keep their sound reaction path even in State 2 and only prematurely end any path when going into State 1. |
shoot | When a gun AI is in state 1 or 2, they will shoot at you. They will hold down the trigger and shoot as fast as possible. For this the game has a variable Reload which decrements by 1 per frame, but only in State 1 and 2. When it reaches 0, the AI will shoot and the timer is reset to the gun's fire rate. Importantly every AI starts at a Reload value of 13 when a floor is loaded or after picking up a gun from the Unarmed state. If you decrement an AI's Reload timer and break LoS, they will have different (potentially even close to 0) Reload values, the next time they see you.
Here are the different AI fire rates: M16: 5fr, Pump: 60fr, DB: 15fr, Pistol: 10fr |
hear sound | The AI's reaction to sound is the highest perceived source of RNG in the game. Ironically most of that perceived RNG comes from the bad path generation.
First every State 0, non-idle AI within a distance of 300 units (except Mafia Stationary Gunmen) has a path generated to a random point within a 128x128 square around the player. Out of the created paths (those that did not fail to be created) the three shortest ones are alarmed. All the others remain in State 0.
The idle AI on Clean Hit will always hear you and turn into a State 0 AR roaming gunman if path generation fails. |
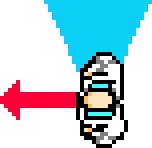
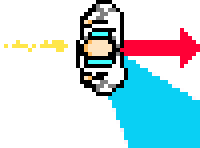
collision mask | Collision masks (CMs) are the blue rectangles from Tab. 6 and Fig. 2. They determine if an object is touching another object or not. As such they are the ones bumping into objects and walls, not your or the AI's sprite. CMs also determine whether or not you can execute an enemy, as your CM has to touch theirs for it to be the case. Lastly a thrown weapon will hit its target if their CMs overlap.
Importantly CMs do not rotate with the object they're attached to. Both you and an AI may turn around, but a 16x8 CM will always double as wide in east/west direction than north/south. |
hitbox | The hitbox is the area of effect of the player's melee weapon. It can be seen in Fig. 2 as the green box around Jacket. It is the same for all weapons. Yes, that indeed means knife and sledgehammer have the same range. |
hurtbox | Hurtboxes are the regions of the player and the AI where they are vulnerable to damage. In the case of bullets, the hurtbox is simply the CM. That means some AI, like melee AI, are easier to hit in a north/south direction. When you perform a melee swing, the AI will actually have two hurtboxes. The first being the CM again and the second being the green boy around the Ai in Fig. 2. Hitting either of these with your hitbox will kill the AI. |
Examples
AlertWait / Reaction Delay | A State 0 AI will see you within 1-30 frames (CheckReload), then Alertwait is set to 15fr, after which they will either be set to State 1 or 2 depending on whether you are still in dLoS or not. So a State 0 AI's reaction time is anywhere between 15fr and 45fr. Two weird effects arise from AlertWait:
If you break LoS while AlertWait is decrementing from 15, the AI will see you through walls and switch to State 2 (then 3).
More impressively, when switching from State 0 to State 1 the AI's Alertwait is set to 10, but does not decrement until it is back in State 0. That means you can have the AI switch from 2 to 3 and back as often as you like, and once they reach the end of their path in State 3 (so they've completely lost track of you), they go back to State 0, AlertWait decrements from 10 and they will see you anywhere on the level, through any amount of walls. You will see them walk to the end of their opath, wait for a moment for CheckReload to reach 0, then go into State 0, wait 10 frames for AlertWait to go to 0, then see you through a wall.
These effects are fairly apparent on Metro 2 or during Neighbors skip. |
Other Reaction Times | In State 3 CheckReload is between 0-20 and there is no AlertWait, so AI's reaction time can go as low as 0 frames. However the third timer Reload can add an additional buffer to gunmen reaction times. Every gunman spawns with a Reload offset of 13fr. So the first time you see a gunman, they will not shoot until 13fr after they see you, so their total reaction time is 28-58fr. Reload only decrements in State 0 and is only reset when the AI shoots, so you could be walking past an AI, lowering their Reload timer and the next time you come across them their reaction time can again be as low as 15fr in State 0 and 0fr in State 3. (Caution: Idle AI will mostly have lower State 0 CheckReloads than 30)
Additionally, State 1 and 2 gun AI will snap directly onto you, if they see you from further than 80 units away. Closer AI will turn around toward you at a rate of 10°/fr, giving you up to 18fr of extra reaction delay. |
indirect LoS | Indirect LoS (iLoS) also leads to some sketchy behaviour.
As most will know, State 3 AI has no check for iLoS, which means that you can hide behind transparent objects from them, until they reach the end of their path and go back to State 0. Non-State 0 AI will also not react to sound, so you can shoot at them without changing their behaviour.
State 2 AI (AI with iLoS) will usually stand in place and snap onto you (because you are unlikely to be seen by an AI from less than 80 units over furniture or glass.
If a gunman hears you and is in iLoS at the same time, he will have a path generated and then be sent to State 2, where he remains for however long he has iLoS. That means he will move along the path and shoot at the same time, resulting in those weird dudes shooting sideways. |